Friday, May 6, 2011

Cat Dissection


For our last lab of my Anatomy and Physiology class Mr. Ludwig came up with the amazing idea to dissect cats (sarcasm!) We learned the INS and OUTS of our cat, whom I named JoJo! :) Altogether I learned 90 parts of the cats body! Although I didn't remember all of the parts (still got a 76 on the final :D) I think that I really learned a lot from this lab. 

By dissecting the cat and seeing things first hand, it really showed me a lot. I didn't realize how much different parts there was to a cat, and how it needs everything to function. I might add that the whole time this cat STUNK! But what else could you expect from a dead cat -aha!- Anyways, as I was saying, this lab taught me a lot of things. I learned a lot of new scientifical names like external nares (nose), rectus abdominus (abs), Duodenum, Jejunum, Ileum (inside of small intestine), Urogential Sinus (place where you pee!) :P

But yeah, really cool lab! Although I might have not enjoyed it every time, it was a good learning experience. I can't say I wish to do it again, but I won't say that I don't regret doing it :)

Friday, March 4, 2011

Checking the Blood & Heart Pressure

heartbeat Pictures, Images and Photosheartbeat Pictures, Images and Photos

Recently Ashley and I decided to play around with a stethoscope and blood pressure readings. At first we tried to do it the old fashion way, but Ashley couldn't figure it out. I was the one being tested so we kept joking that the darn thing didn't work 'cause I didn't have a heartbeat! (Ha Ha!) It was difficult for Ashley to pump the air through, and that's mainly because there was a hole in ours. Ashley attempted it multiple times just to see if we'd get the hang of it, but we didn't, so no heartbeat was heard. So then we moved on to the blood pressure monitor. Once again we had trouble working it, but then after Ashley came up with an amazing idea to bring it up to 160 instead of 120, it worked. When we did it I had to to get up to 160 just to get my reading, but Ashley only had to at 120. The monitor got hers right away while mine took a little extra umph! (Just my luck) Anyways, we learned about the lub and dub of the heart. The first beat of it is the lub, while the second is the dub, thus explaining why the heart is Lub Dub :) It was really difficult to find the heartbeat every time we tried, but it was a learning experience, and it was pretty neat to learn how to do it.

heartbeat Pictures, Images and Photos heartbeat Pictures, Images and Photos

Play Doh of the Ear


For a presentation we had to do in class we decided to teach everyone about the ear. We created a presentation as well as a structure of the inner and outer ear. The one pictured above is the one we made out of play doh! It's pretty awesome! :) Below is the link to the presentation Ashley and I did. Hope you enjoy! :)
http://www.formatpixel.com/go/en/users_view_info.php?id=22294

Wednesday, March 2, 2011

Heart Dissection

Photobucket

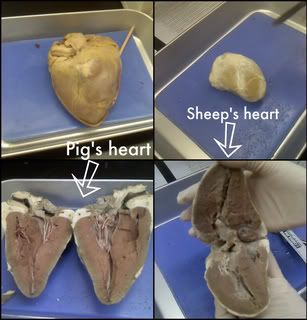
So a week ago for class we dissected a Sheep's heart. While our other classmates were off with their Pig and cow heart, we were stuck with our little, sheep's heart (a-ha!) As you could see from above the other hearts were about 3X bigger than my partner Ashley and my. Even though our heart wasn't as big, and it  wasn't as clearly noticeable to find parts of the heart, we still did it. First we decided to cut the heart in half to get an internal view of the heart. It was really interesting to see all the parts of a real life heart. We were able to locate all the parts listed on a worksheet Mr. Lugwig gave us, and measure how big all the parts were. While others in the classroom were coming up with 3 inch parts, Ashley and I were lucky if we got over 1. It was kind of funny, but it just showed the difference in how the hearts were. And although they may have been different in size, it didn't make a difference in their function! :)

Monday, February 28, 2011

Virtual Cardiology Lab (Part I)

Purpose:

Find information on diagnostic tools and find background information on the anatomy and physiology of the heart to understand basic concepts covered in the lab.

Questions:
  • Symptoms of a selection of heart diseases, to serve as examples of what kinds of things can go wrong with the heart. How are symptoms detected and why?
  • Tools and techniques used for diagnosis. What can the different techniques detect and how do they work?
  • Principles of pedigree analysis.
Materials:
For this lab I learned what different tools do for different functions of the body. Like...
  • The stethoscope i used to monitor the sound made by the vibration of the heart and blood as pumping occurs.
    • Allows one to hear the two heart sounds
      • First occurs at moment of mitral and tricuspid valve closing
      • Second occurs at moment of aortic and pulmonic valve closing
  • Moderate bradycardia and mitral valve regurgitation cause irregularities in the sound of the heart
    • Bradycardia is an abnormally slow heart beat rhythm
    • Mitral valve regurgitation occurs because of an inability of the mitral valve
  • A murmur is a rumbling or blowing sound that is made by the heart, often by malfunctioning heart valves.
    • Associated with problems involving the heart valves
    • Can be highly variable, from low frequency rumbles to higher pitched blowing sounds
    • Could occur during systole or diastole
    • Caused by a valve being too narrow, a leak, or congenital holes in the heart
After learning some terms I went through the lab and performed a preliminary stethoscopic exam in order to listen to the patients heart. The patient was a male that went by Bob B. Blood. He was 35 years old and a dwarf. He was referred by a physician after experiencing breathlessness and erratic heartbeat.


After listening to the rhythm of Bob's heartbeat I found out that the heart sound showed the first and second sound to be abnormal. So I did further testing and learned what more tools were used for.
  • Echocardiography images are made by images being compiled from ultrasound reflected from the heart tissue.
    • Uses ultrasound emitted from probe, sound reflects back to probe when encounters solid object. 
    • Results are compiled with a computer.
  • The orange and blue colors on the blood indicate whether the blood moving toward or away from the probe.
    • Doppler echocardiography detects movement of blood
    • Has nothing to do with oxygenation or temperature
  • The heart cannot be measure with echocardiography by the oxygen content of the blood.
    • Can provide very good real-time images of the heart
    • Valve movements monitored, heartbeat measured by observing the movements, and size of the chambers can be calculated
    • Can't monitor chemical compositions of blood, so can't measure oxygen content.
So next we looked at a 4-Chamber detail view of Bob's heart and found out he was missing the wall between the right and left atria, a form of atrial septal defect. Then I saw what it looked like compared to a healthy heart.


After I finished the examination and learned even more! (surprise, surprise!) I learned...

  • In a pedigree chart, an unfilled square symbol with the number II3 represent the third individual, who is male, in the second generation of the family.
    • Pedigrees males are represented by squares
  • The purpose of pedigree analysis is to determine whether a disease is inherited and what the pattern of inheritance is.
    • Only carried out to determine the inheritance of a specific trait within a family
  • If two of sex children of two perfectly healthy parents are born with a serious genetic disease, then the disease is recessive.
    • In the case of a dominant trait, at least one parent would have to be affected
    • Fact that three of the children are affected with the same disease and that the parents are related suggests that the disease is inherited
The final examination was to determine whether the heart condition under consideration is inherited. I used non-invasive procedures to find out which relatives are affected (the actual steps were not shown). After reviewing the family history of Bob I concluded that the lineage supports an autosomal recessive pattern of inheritance. 

Pedigree Exam Diagosis

Bob has a niece (III/4) who is affected. This pattern of inheritance is consistent with autosomal recessive traits. Bob and the affected niece are homozygous with respect to this recessive mutation, while both parents (I/1 and I/2) as well as the younger brother (II/5) and sister-in-law (II/6) are heterozygous carriers.

In the End! With the help of the lab I concluded that Bob suffered from Ellis van Creveld syndrome! Which you can identify at:

http://www.hhmi.org/biointeractive/vlabs/cardiology/b_nav/5note/encycloframe.html 

'Cause I don't think this blog needs a whole lot of writing than already given :)
And this is only Part I! :)

Monday, January 24, 2011

Putting our Brains Together :)


For A&P my classmate Ashley and I, along with the rest of the class dissected a sheep's brain. We started off by cutting off all the bone and skin attached to the brain. The smell was horrible I might add, and if it wasn't for the smell I might have not been so nauseated :) Anyways, my partner, Ashley, thankfully that day couldn't really smell due to sinus problems so she handled most of it. She cut the brain sagittally and when we opened it my curiosity only grew from then on. We nipped away at little parts trying to figure out which part of the brain was which using a website that Mr. Ludwig showed us. You can find it at http://www.gwc.maricopa.edu/class/bio201/brain/brshpx.htm

The most noticeable part of our brain that we could make out was the cerebellum. You can tell by one of the pictures that Ashley is holding up in one of the photos above. We also could pin point the medulla, spinal cord, pons, Occipital, parietal and frontal lobe. The rest we figured out from the website :)

All and all seeing a brain for myself, in a such a upfront way showed me a lot. I think its amazing how one little organ like that controls your whole entire body. Crazy how whenever that sheep was alive his/ her body sent electrical waves or whatever it is through it. To think I had the brain that contained an animals whole way of living right in my palm was kind of cool. Seeing all the different parts of the brain was really cool and I'm glad we did this lab. I just hope our next one doesn't quite as much smell as bad :)

Friday, January 14, 2011

Leech Neurophysiology Lab


Purpose/ Hypothesis: 


For this lab, my hypothesis is that each cell will all respond differently. Each will show that each cells is responsible for collecting touch information from the skin of the leech to its brain.

Materials

Feather, Probe, Forceps, Scissors, Pins, Scalpel, Dissection Tray, Leech Tank, 20% Ethanol, Leech Tongs, Dissection Microscope, Micromanipular, Oscilloscope, Leech

Procedure: 
  1. Anesthetize and dissect the leech
  2. Remove leech innards and observe ganglion
  3. Cut out the ganglion window
  4. Isolate one ganglion
  5. Cut the ganglion sinus
  6. Probe and identify ganglion sensory cells
Results

After repeating the experiment a couple of times it was shown that the cells did in fact respond differently. There were cell types: N, T, P, R and X. Each cell either reacted differently to the feather, probe and forceps or had no stimuli at all. The results for the Dyed Cell pointed out which cell type they were.

Conclusion:

The cells all responded differently. After testing all the possible results they each showed that cells are indeed responsible for collecting touch information from the skin of the leech to its brain. By each reacting to the different objects with alternative stimuli they show that not every cells corresponds and does what one another does. This only proves the previous hypothesis stated from the beginning.